Aquarium Tip Tank Podcast 016 | Aquarium Care Tips for a Holiday or Vacation, a Fish, and Some Problems

Podcast: Play in new window | Download Aquarium Tip Tank Podcast 016 Finally! It’s here! Here is another Aquarium Tip Tank Podcast filled with aquarium tips to help you set ...

Easy Cleaner Crew Acclimation

A little while ago we shared some aquarium tips and pictures about acclimating aquarium livestock and the Doradon Aquarium Acclimation System here. A few days later, I added some peppermint shrimp to my fish tank. This time, it was time to add the rest of the cleaner crew to my 30 gallon saltwater aquarium. Of course, even the snails, red-legged hermit crabs, and blue-legged hermit crabs need to be acclimated. This time, I decided to make a video of the acclimation process!

This method of aquarium livestock acclimation works great for small fish, cleaner crew, and small coral frags. However, not all fish are small and the big fish need to be acclimated as well. For larger aquarium livestock it would probably be wise to drip acclimate into a bucket. Say tuned to Aquarium Tip Tank and the Aquarium Tip Tank YouTube Channel! We will  share more aquarium tips and show you how we acclimate the big fish when we get one!

Any questions about acclimating your livestock? Leave comments below!

TJ

Read full story Comments { 0 }

Aquarium Tip Tank Podcast 014 | Stocking a Fish Tank

Aquarium Tip Tank Podcast 014

It’s about time to put some fish in the tank. The 30 gallon saltwater aquarium has been running for 2 months. I’ve added a complete cleaner crew and I need to figure out what fish I want to put in the aquarium!

In this episode of the Aquarium Tip Tank Podcast I talk about the scientific art of stocking a fish tank. I try to explain why there are limitations to the number of fish that you can keep in one fish tank. I also discuss some of the rules of thumb that are used for stocking an aquarium, their exceptions, and how I like to go about putting fish in my tanks.

Aquarium Tips of Note in this episode:

  • Don’t overstock your aquarium
  • Stock your fish tank slowly
  • Perform water quality tests on a regular basis

Is it time for you to put fish in your tank? Do you have any questions or comments? Leave them below!

TJ

Read full story Comments { 2 }

Adding Peppermint Shrimp to a Saltwater Aquarium

A couple of days ago at Aquarium Tip Tank I wrote about using the Doradon Aquarium Acclimation System to acclimate all new livestock to the water conditions of your tropical fish tank. What I didn’t tell you is that I first used the system to acclimate 3 Peppermint Shrimp (Lysmata wurdemanni)! These were the first of the cleaner crew, and the first of any livestock that I added to my 30 gallon saltwater tank. Today I will share some pictures and some aquarium tips for adding Peppermint Shrimp to a saltwater aquarium!

I have to admit, I had originally planned on adding a much larger cleaner crew to my tank. Unfortunately, when I asked my Local Fish Store (LFS) about a cleaner crew, the aquarium salesman said, “Well, we just took down our cleaner crew tanks and we’re about to start setting them back up. So, we probably won’t have much as far as cleaner crew goes for about 4 weeks.” My thoughts were, “Great. I’ve been cycling my tank for 4.5 weeks. I’ve got some diatoms blooming, and some algae starting to grow all over the live rock, live sand, and walls of my tank. Do they have anything in here that might eat some of that and help clear my tank up a little bit?”

Luckily, the LFS at least had some Peppermint Shrimp. While the Peppermint Shrimp is best known for enjoying a meal of nuisance Aiptasia, it will also scavenge the aquarium picking at the live rock and live sand for detritus, uneaten food, other nuisance algae, and decomposing organic material. Peppermint Shrimp have also been successfully tank bred.

While 3 Peppermint Shrimp won’t be a complete cleaner crew for my 30 gallon aquarium, it is at least a start. Like many invertebrates, Peppermint Shrimp can’t tolerate copper-based treatments or high nitrate levels. I’ve done some water testing and my water parameters are suitable, but I also know that if the Peppermint Shrimp survive, then some fish will survive too! Don’t get me wrong, I don’t want to put any aquarium livestock into unsuitable and stressful conditions. However, Peppermint Shrimp are abundant, have been successfully tank bred, and are sustainable. I’ve done everything that I can to ensure that aquarium conditions are suitable, and its time to acclimate these 3 Peppermint Shrimp and add them to my tank!

The bag of Peppermint Shrimp Hanging for Temperature Equalization while Dripping Aquarium Water Into it for Chemical Equalization

To read a little bit about acclimating new livestock check out what I wrote here.

2 Peppermint Shrimp in Corner of Bag being Acclimated

When the Peppermint Shrimp were done acclimating it was time to get them into the main tank. Whenever you do this with any livestock DO NOT just dump all of the contents of the bag into the main display tank. If the original water in that bag came from your LFS you have no idea what might be in there. If the water in that bag came from your quarantine tank, then it might contain the remnants of some copper based quarantine treatments (more on that later). Grab your trusty aquarium net, scoop up the Peppermint Shrimp, let the bag water drain back into the bag, and swiftly but gently add the Peppermint Shrimp to your main display tank!

One of the Peppermint Shrimp worked its way over to the corner of the tank under the heater.

Hopefully, the Peppermint Shrimp start exploring their new home and scavenging food from the live rock and live sand immediately after being added to the tank.

Peppermint Shrimp Hanging Out Upside Down Under Live Rock

Are you adding new tank mates to your aquarium? Show us! Leave comments below.

Stay tuned to Aquarium Tip Tank for the next round of cleaner crew additions!

TJ

Read full story Comments { 0 }

Unpacking the Doradon Aquarium Acclimation System

If you follow along here at Aquarium Tip Tank you know that I have been going through the process of setting up a 30 gallon saltwater aquarium. A couple weeks ago, I decided that it was time to start adding a cleaner crew to the tank. At that point the aquarium had been cycling for about 5 weeks, there had been a few nice diatom blooms, and it was time to add some hardy invertebrates that like to feed on some of the algae.

As with any livestock that is going to be added to an aquarium, I needed to make sure that all of the members of the cleaner crew were acclimated to the conditions of my saltwater aquarium. I started to investigate and do some research into ways to make my own acclimation system until I did a quick search on Amazon. There, I found the Doradon Aquarium Acclimation System for only $20.

Sure, I could’ve gone to the hardware store and found some small diameter tubing, a drip valve, and all of the other materials necessary for this project. However, I probably would’ve spent $20 or more at the hardware store and a whole lot more than the 2 days that Amazon takes to deliver items to my doorstep.

The Doradon Acclimation System all boxed up

The Doradon Aquarium Acclimation System allows users to equalize new aquarium livestock to both the temperature and chemical conditions of your fish tank simultaneously. It holds the bag that your local fish store sent your new fish, coral, shrimp, or invertebrate home in, allowing it to float in your aquarium water to equalize temperature while keeping the top of the bag open to equalize the chemical conditions by dripping water from your tank into the bag.

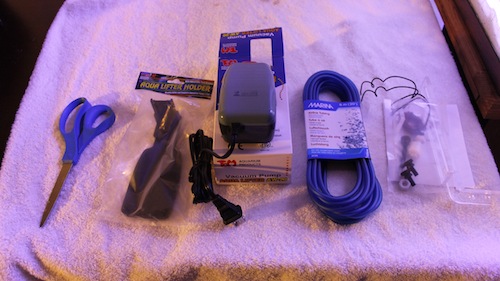
Opening the Box of the Doradon Aquarium Acclimation System

The Doradon Aquarium Acclimation system includes all of the necessary parts and pieces to hang an open bag in your aquarium water and drip your aquarium water into the bag. All of the parts and pieces are also different colors! This helps make the included instructions easy to follow. The three main parts are the blue aquarium frame with the silver thumb screw, the green bag holder, and the clear dripping cup with flow control nozzle.

The parts assembled with the directions, but still in the box.

Above, you can see all of the parts assembled. The green bag holder has a hook that slides onto one of two spots of the blue aquarium frame. The clear dripping cup has two holes at the back that allow it to slide onto the pointed cup supports at the top of the blue aquarium frame.

Blue Aquarium Frame on the Tank

To start getting the Doradon Aquarium Acclimation System on the tank, you should first put the blue aquarium frame on one wall of your aquarium by itself.

Thumb Screw Used to Keep the Aquarium Frame Upright and Level

The thumb screw allows the acclimation system to be used on various aquarium wall thicknesses. Adjust the thumb screw so that the blue aquarium frame stays upright and level on your fish tank with a little bit of pressure pulling the aquarium frame forward. After all, you’re eventually going to hang a bag with livestock in it from this frame. You don’t want it tipping over, and ruining your plans to acclimate your livestock.

Livestock bag attached to bag holder.

The next step is to pull the top of the livestock bag through the bottom of the green bag holder, open the bag and wrap the open end of it out and around the outside of the green bag holder. Use the pointed arrows of the green bag holder to poke holes in the top of the livestock bag so that it can be held securely by the green bag holder.

Livestock Bag floating in Aquarium water and being held by the green bag holder and blue aquarium frame.

Next, you can pick the green bag holder up with the livestock bag attached to it, and slide the hook on the back of the bag holder over one of the holder supports on the blue aquarium frame. At this point, you should have a bag of livestock floating in your aquarium water with the lights off. The temperature is equalizing, and its time to start equalizing the chemical conditions with the drip cup!

Dripping Cup with Aquarium Water hung from Aquarium Frame and dripping into livestock bag.

All you have to do is dip the dripping cup into your fish tank to collect some of your aquarium water, hang the dripping cup on the blue aquarium frame of the Doradon Aquarium Acclimation System, and adjust how fast your aquarium water drips into the livestock bag using the flow control nozzle at the bottom of the dripping cup.

Acclimation to your Aquarium Conditions in Process

Now, just let the acclimation system do its work for at least 15 to 20 minutes. If there is still water in the dripping cup after 15 to 20 minutes, just leave everything alone until the dripping cup is empty. I actually like to let everything acclimate for about 30 to 45 minutes. The temperature will come to equilibrium in about 15 to 20 minutes, but it usually takes a little longer for the chemical conditions to equalize.

I hope you made it this far because I have a couple more aquarium tips about acclimating your livestock. First, use a quarantine tank. No, a quarantine tank may not be absolutely necessary for your first round of cleaner crew. However, a quarantine tank should definitely be used for every fish that you place in your display aquarium. Yes, I’ll admit that I’m guilty of not always using a quarantine tank with new fish, but you never know what kind of disease, parasites, and stress the fish store has given the fish that you just brought home. That disease will quickly spread to the rest of your fish tank and you’ll end up scrambling to set up a quarantine tank to keep your display aquarium alive and thriving. Its much easier to just use a quarantine tank first, get rid of all the fish diseases, then acclimate from your quarantine tank to your display tank.

Second, acclimate livestock that comes from different tanks and systems of your LFS separately. For example, you may stop by your LFS and pick up a cleaner crew from one tank or tank system while also picking up a fish from another tank or tank system. Or maybe you purchase a fish from one wall of your LFS and another fish from another wall of your LFS. Do not put them in the same bag and acclimate them together. Acclimate livestock from different aquarium systems separately. Sure, that one wall of tanks in your LFS is probably working off of the same filtration system with the same sump, protein skimmers, filters, etc. The other fish that you get from that other wall of tanks is probably running off of an entirely different system and the water characteristics may be different. Acclimate them separately and they will go through a much safer, and less stressful acclimation process.

Finally, acclimate between every tank. Acclimate between your LFS and your quarantine tank, and acclimate between your quarantine tank and your display tank. Your fish and your aquarium will be much happier, and much healthier if you take just a few simple steps.

Putting fish in your aquarium? How do you acclimate them to your tank? Leave comments below.

TJ

Read full story Comments { 0 }

Aquarium Tip Tank Podcast 013 | Elite Reef and Marine-Engineers Interview with Michael Rice

Aquarium Tip Tank Podcast 013

We’ve been saying that we’re going to have some interviews here on the Aquarium Tip Tank Podcast since the start. I’m excited to say that for our first interview we were able to talk to a reef store manager and the owner of a marine aquarium hobbyist news website all in one! In this episode of Aquarium Tip Tank Michael Rice was kind enough to take some time to talk to us. He has a website at marine-engineers.org, he manages Elite Reef, a reef hobby store in the Denver, CO area, and he’s got several years of experience with home aquariums.

Michael shares the story about how he got started in the marine aquarium hobby as well as some aquarium tips about the types of tanks to purchase, stocking a tank with sustainable livestock suppliers, and making sure you do a little bit of research about the fish and aquarium equipment you want to purchase. Elite Reef and Marine-Engineers.org also hold an annual Elite Reef fest that is all about fun and helps raise some money for some great charities.

Where to find Michael Rice:

Sustainable Marine Fish and Invertebrate Suppliers mentioned in this episode:

Charities that Elite Reef Fest has raised money for:

What did you think of the interview? Leave some comments below!

TJ

Read full story Comments { 1 }

Water Quality Testing TJ’s Cycling 30 Gallon Saltwater Aquarium

The saltwater aquarium that I have been setting up is going through the cycling process. During this period, it is important to test water quality for ammonia, nitrite, nitrate, and pH. Here, I share a few pictures, and a few aquarium tips about testing the water quality of a tropical fish tank.

While a new aquarium is going through a nitrogen cycle, a spike in ammonia levels is the first change that should be noticed. Next, the ammonia levels start to recede and gives way to a spike in nitrite. Finally, the nitrite levels recede and a spike in nitrates occurs. This process occurs in both freshwater and saltwater aquariums. To hear all about the nitrogen cycle in new aquariums, take a listen to Aquarium Tip Tank Podcast 011.

There are several test kits to choose from. I chose to use an API Saltwater Master Test Kit.

API Saltwater Master Test Kit unopened and off the shelf

This test kit contains tests for pH, Ammonia, Nitrite, and Nitrate. These are the most important water quality parameters to test for in a cycling aquarium. The API Saltwater Master Test Kit uses liquid reagents to turn vials of aquarium water colors for comparison to a color scale. All of the necessary reagents, vials, instructions, and color scales are provided in the test kit.

API Saltwater Master Test Kit Color Scale Card

Of course, when anything that is going to be used in your aquarium water is first opened it should always be rinsed off with tap water. Then, prior to performing any tests, the vials to be used should be rinsed with the water to be tested.

Water Quality Test 3 Weeks into Cycling Saltwater Aquarium

These are the results of the water quality test that I performed after my saltwater tank had been cycling for about 3 weeks. Of course, I’d like the ammonia levels to be at 0 parts per million (ppm). However, I had just added some fish food to the tank a couple days prior in order to allow it to decompose. When held under a better light and against the white background of the color scale, the color was somewhere between 0 and 0.25 ppm.

The nitrates were at 0 ppm, and the nitrates look like they were around 10 ppm. At this point, there were some light brown diatoms growing in the tank, and these water parameters are almost exactly what was expected.

With the diatoms growing in the aquarium, and the water quality looking suitable it was time to start adding some livestock that will help keep the tank clean. Yes, it was time to start stocking with an aquarium cleaner crew. Stay tuned at Aquarium Tip Tank to find out how stocking the tank with some cleaners went!

How are the water parameters in your aquarium doing? Perform a test, and leave some comments below!

TJ

Read full story Comments { 0 }

Aquarium Tip Tank Podcast 012 | Diatoms and New Tank Syndrome: The Good, The Bad, and The Ugly

Aquarium Tip Tank Podcast 012

My 30 gallon saltwater tank is almost done with the initial nitrogen cycle, but a brown film has started to coat my live sand and live rock. This is a diatom bloom and what many aquarium hobbyists call New Tank Syndrome. In this Aquarium Tip Tank podcast I share some aquarium tips for dealing with a diatom bloom. I also share some information about what diatoms are, where they come from, and why they decide to coat a tropical fish tank.

I wanted to be able to show you some of these diatoms that are growing in my fish tank. I’ve included a few pictures below.

Light Brown Diatoms on Live Rock and on Live Sand

At this point I also have a few small spots on the live rock with some green algae and some light purple coraline algae. Hopefully, you can see both of those in the picture below.

Spots of Green and Purple Coraline Algae growing on Live Rock

I also mentioned in the podcast that I would include the picture that Ryan Howells shared with me. He has a fairly new nano aquarium with a mated pair of clownfish that have laid some eggs! Here is the picture that he sent me of his tank!

Ryan Howells’ Nano Aquarium with a Mated Pair of Clownfish

Ryan’s tank looks like it is working out to be a nice little marine aquarium! He recently contacted me and told me that he was just finishing up the cycling process of his tank. It looks like he’s got a little more than that! There’s a nice colony of coraline algae, and of course, his mated pair of clownfish!

I had stated on many previous podcasts that I would give listeners a shout out if they decided to get in touch with me, let me know about an aquarium breakthrough, and send me a picture of their tank. I’m a man of my word! Keep sending your fish tank breakthroughs and updates.

Have a diatom bloom in your fish tank? Leave comments below!

TJ

Read full story Comments { 0 }

Unpacking the Koralia Evolution 550gph Movement and Circulation Aquarium Pump by Hydor

If you’re a frequent visitor here at Aquarium Tip Tank you probably know that I am in the process of setting up a 30 gallon saltwater aquarium. Actually, you’ve probably already seen pictures of the Koralia Evolution water circulation pump set up in this fish tank. However, I’m not quite sure that I’ve actually showed you the pump itself and explained who it is made by, why it is necessary, and how it works. I figured it is about time to share that information with you!

First, lets talk a little bit about water circulation in an aquarium. Good water circulation is important in a home aquarium for three main reasons. Water circulation provides a means of food delivery, waste removal, and the provision of oxygen.

In order to adequately disperse and deliver the food that is fed in a broadcast manner to the livestock of your aquarium, water must be circulated around the entire fish tank and to all corners of the aquarium. This is especially important when dealing with sessile invertebrates. After all, they don’t really move. Of course, you can dose individual corals with food filled syringes, but corals and their symbiotic zooxanthellae algae also grab the tiny particles of plankton and nutrients that are floating in the water. In order to make sure that the food an nutrient rich water passes close enough to the sessile invertebrates to feed, good water circulation is necessary.

Not only does circulating water deliver food and nutrients to all parts of a fish tank, but it also picks up and removes waste particles that have been left behind. The oceans have waves, currents, and tides that are constantly creating water circulation that removes waste. In an aquarium, water circulation must be created in order to pick those waste particles up and off of the corals, rocks, sand, and decorations. Proper water circulation will then help bring those waste particles to the inlet of the filtration system so that they can be removed from the aquarium water.

Finally, water circulation in a home aquarium helps with oxygenation of the water. Water does not have the ability to hold as much oxygen as air does. The warmer the water gets, the less oxygen it can hold and warm saltwater holds the least amount of oxygen. If water in a fish tank were left stagnant, only the water in the top water column of the tank would be in contact with the air for oxygenation. Good water movement will constantly circulate all of the water to the air/water interface, allowing gas exchange and proper oxygenation for all of the water in the tank.

Okay. Now that we know why proper water circulation is important in a home aquarium its about time I show you some pictures of how I’m moving the water around my 30 gallon reef tank.

The Koralia Evolution 550gph Movement and Circulation Pump Revealed

Koralia Evolution 550gph ready to be opened!

Most manufacturers show flow rates and recommended tank sizes for their pumps. As shown below, Hydor provides a chart on the back of their Koralia Evolution Movement and Circulation pumps.

A very general rule of thumb that is used when it comes to flow rates is that water circulation should be at a flow rate equal to ten times the net water volume of the tank for soft corals. For example, I’m putting this pump in a 30 gallon tank. Therefore, the flow rate for water circulation should be at least 300 gallons per hour (gph) if keeping soft corals. For hard corals, a flow rate equal to 30 times the net water volume of the tank can be used. Therefore, for hard corals, the general rule of thumb states that I would need 900 gph of water circulation.

I’m currently only putting one Koralia Evolution 550 gph Movement and Circulation pump into the tank, and that should work for right now. When I decide to put hard corals into the tank I may need to add another pump for a total of 1100 gph from power heads. However, some water circulation is also produced by filter returns and protein skimmers and another power head may not be necessary. That is a decision for future TJ to make.

Flow Rate Chart on back of Koralia Evolution box.

The Koralia Evolution 550gph in its box.

Koralia Evolution 550gph Movement and Circulation Pump out of the box!

Koralia Evolution 550gph Movement and Circulation Pump by Hydor in the Fish Tank!

Shown above is the Koralia Evolution 550gph pump by Hydor mounted to the side of my tank. Currently, the pump is actually closer to the top of the tank. The top of the tank just seemed like a better spot for the power head once the live sand, live rock, and saltwater were all in place. The location near the top of the tank also helps create some waves and turbulence at the air/water interface to help with oxygenation.

How do you circulate the water in your aquarium? Leave comments below.

TJ

Read full story Comments { 0 }

Setting Up TJ’s 30 Gallon Saltwater Aquarium

Yes, it has been about 3 weeks since I’ve actually had this saltwater fish tank set up and cycling. However, I wanted to make sure that I put together a decent video showing all of the steps that I took in order to set up this saltwater aquarium. I went over all of the steps of setting up a home aquarium in Aquarium Tip Tank Podcast 010, and the process of cycling a tank in Aquarium Tip Tank Podcast 011.

Shown below, is the video of how I used all of these steps to go ahead and set up my 30 gallon saltwater aquarium. I had all of my saltwater made, and all of my live rock, live sand, and aquarium equipment set up and ready to go.

I also made a time-lapse video of the water going from cloudy to clear and you can see that in the video below. I admit, it is a video of a blue-ish purple cloudy tank. However, we want to show you everything that we can here at Aquarium Tip Tank so we figured we’d go ahead and take some pictures over the 3 hour period that it took for the water to clear up.

I started taking pictures as soon as all of the live rock, live sand, and saltwater were in the fish tank and all of the equipment was up and running. A picture was taken every 6 seconds for a period of 3 hours. Each picture is a frame in the video and the video was put together at 30 frames per second.

The API Nexx Canister Filtration system was running at this time. It seemed to be working great during this time period. However, shortly after the water was cleared up is when I realized that the filtration system was leaking again. I immediately turned the API Nexx Canister Filter off, took it off my tank and sent another email to RENA. Of course, I will keep everybody updated on what happens with the filter.

Luckily, I don’t really need a filtration system set up in order to cycle the tank. I do have good water flow and water movement because I have a Hydor Koralia Evolution 550 Aquarium Circulation Pump up and running. Therefore, the water will still move well around the tank. Gas exchange will still occur between the top of the water and the air in my house. The fish food and pieces of krill that I add to the tank will still decompose, and ammonia will be formed. Then, the beneficial nitrobactors will take over and the aquarium will go through its cycling process.

A filter is not absolutely necessary for this process. A sump and/or refugium is the best way to filter a marine reef aquarium. However, I don’t have enough room under my fairly small 30 gallon aquarium to put a sump. The good thing is that I do have a whole lot of live rock, and live sand for biological filtration. I will also add a protein skimmer to help with filtration. I will also make sure that the cycling process is complete and that the water conditions are constant and pristine before adding any livestock.

I hope you enjoyed the videos! The tank has been set up for 3 weeks and is going through the nitrogen cycle process. Keep checking back at Aquarium Tip Tank to follow the progress of this tank!

How is your fish tank coming along? Leave comments below!

TJ

Read full story Comments { 1 }

How To Make Saltwater for a Small Marine Aquarium

Yes, this one is pretty simple. However, there are a lot of people that shy away from starting a saltwater aquarium when they realize that they have to somehow make, or acquire, actual saltwater to fill their fish tanks with. In reality, mixing up some saltwater takes less time than running water through an RODI filtration system to get purified water. Some people don’t want to take the time to use an RODI filter, but we recommend an RODI filter to purify all of your water for any type of fish tank that you have, be it freshwater or saltwater.

Once you have your canisters of RODI purified water, it really only takes a few minutes to measure your salt mix, pour it into the purified water, mix, and test for specific gravity and salinity using a hydrometer or refractometer. I use Instant Ocean Reef Crystals Reef Salt and literally just follow the directions on the back of the bag. Below, I’ve included a video about how I mix my saltwater.

In the end, it ends up that it takes almost exactly 2.5 cups of salt mix for me to make a 5 gallon bucket of saltwater. These days, I go ahead and put 2 cups straight into my RODI purified water, mix up the salt, do a quick specific gravity and salinity test, and add another 0.5 cup of Instant Ocean Reef Crystals Reef Salt. Obviously, I’m still starting out on the low end of specific gravity and salinity when I only have 2 cups of reef salt in a 5 gallon bucket of water. Personally,  I just like to test, and make sure that everything is mixing correctly.

So what do you do if you have a larger tank and you need to make more than 5 gallons of saltwater at a time? There are a few options here. One is to have several 5 gallon buckets of water. For example, if you have a 100 gallon home aquarium, you would need 20 gallons of saltwater to perform a 25% water change. You would need to make 4, 5 gallon buckets of saltwater and make sure that the water conditions all matched.

Maybe you have a 20 gallon container for your saltwater. Hopefully it has wheels. Just fill it up with RODI purified water and add 1o cups of Instant Ocean Reef Crystals Reef Salt.  You may want to start with 9 cups, do some specific gravity and salinity tests, and add more salt mix until you get to the correct water conditions. Try this the first couple of times and you may end up finding out that you’re adding that 10th cup of salt mix every time you go to make a 20 gallon container of saltwater.

Whatever way you decide to make your saltwater, and whatever type of salt mix you choose to use, it really isn’t very difficult to mix up some saltwater. Just follow the directions on the salt mix container, and remember to do a few quick checks of your water conditions while your making your saltwater.

Most salt mixes state that the saltwater you make with them can be used immediately. This is true, and some people do this without any detrimental effects to their saltwater tank. However, I like to let my saltwater sit for a little while before placing it into the tank. I like to make sure that all of the salt and all of the beneficial trace elements, and vitamins are properly dissolved in the water. This also allows the saltwater to have some time for gas exchange and oxygenation before pouring it into the tank. If you let your saltwater sit in a container for several days, make sure that you test the water conditions one more time before pouring it into your tank just to make sure that none of those water conditions changed unexpectedly.

How do you make your saltwater? What salt mix do you use? Leave comments below.

TJ

Read full story Comments { 0 }

Aquarium Tip Tank Podcast 011 | Setting Up a Home Aquarium, Part 2 – Cycling A Fish Tank

Aquarium Tip Tank Podcast 011

On the last episode of the Aquarium Tip Tank podcast we talked about all of the steps to setting up a home aquarium up until the nitrogen cycle. Since then, I’ve been setting up my 30 gallon salt water aquarium and have started the cycling process. Are you in the process of setting up a tropical fish tank?

In this episode I discuss the final step necessary for setting up a home aquarium. Yes, its performing the cycling process of your tropical fish tank. I discuss why the cycling process is necessary, what happens during the cycle, and methods for performing a fish tank cycle.

You can go check out the post about how I performed my aquarium system check here. I took a few pictures documenting the rest of my aquarium setup process, and they are included below.

Draining the Fish Tank after a System Check

Ready to make some Saltwater for the Aquarium

Making saltwater for the aquarium was very quick and easy with Instant Ocean Reef Crystals. Instant Ocean claims that the Reef Crystals are specially formulated for use in reef aquariums and contains extra calcium, additional trace elements, vitamins, and a metal detoxifier to ensure the health and growth of reef life. Check back at Aquarium Tip Tank for more about making saltwater for your aquarium. We’re feeling a video in the works.

The First Bag of Live Sand being added to the Tank

Next, some Live Rock was needed

Saltwater is Necessary for a Marine Aquarium

Now, remember not to freak out if your water turns cloudy when adding the saltwater. Some tiny particles in the live sand are just getting picked up in the water and will take a few hours to clear up. As shown below, my tank had such a milky white cloud that nothing could be seen inside the tank after it was filled with saltwater. It took about 4 to 5 hours to clear up after turning on my canister filter.

I can’t see anything in that cloudy tank!

Then, when I went to check on things I found water on the floor, under the canister filter. As stated in the podcast, Aquarium Tip Tank no longer recommends the API Nexx Aquarium Canister Filter. At this point, we just don’t trust them. Yours might end up working great. Ours ended up leaking.

Thankfully, it was only the canister filter. I was able to stop the filter and get it out of the tank without too much of a mess. Also, it isn’t absolutely necessary to have a filter running during the cycling of a tank. Some even say that they only run their power filter or canister filter while clearing the cloudy water, then they turn the filter off. The theory is that the filter will end up extracting things that you want to keep in your tank during the cycling process. For example, decaying food particles actually help jump start the cycling process by creating an added ammonia source for beneficial  bacteria to feed on. So, you actually want to keep those decaying food particles in the tank and in the water rather than sucked up in your power filter or canister filter. I may end up just adding a protein skimmer and leaving water filtration up to it and the biological filtration in the tank itself. As always, whatever I decide, you’ll know it here first!

Items Mentioned in this Podcast:

My tank is currently cycling, and creating that biological filtration system. How is your tank coming along? Leave comments below.

TJ

Read full story Comments { 0 }

Aquarium Tips of the Day | Be Creative and Functional with Aquascaping

Today’s Aquarium Tip Tank tips will help you enjoy your tank while making sure that it also fits all of the needs of your livestock. Want to make sure that your tropical fish tank looks a little different from all the rest? Want to make sure you enjoy a little personalized style in your aquarium? But what about making sure that you’re providing a cave or some hiding spots for your butterfly fish at night? What about making sure that you’ve got places to secure all of your corals so that they can get the necessary light they need? Well, go ahead and be creative with your aquascaping, but while you’re doing it just keep in mind the needs of your livestock.

We don’t only talk about reef tanks here, that just happens to be what I’m trying to set up. Therefore, you don’t have to use live rock, or any rocks for that matter. You can go out and get fake decorations that suit both the needs of your creativity and the needs of your livestock. Or, maybe you want to arrange, cut, scrape, and sculpt your rockwork into your own fun and useful decorations! My opinion is…go nuts. If people ask you how and why you aquascaped the way you did, its time for a fun lesson!

Share some pictures of your aquascaping! Fire me an email at tj@aquariumtiptank.com if you have too!

TJ


Read full story Comments { 0 }
UA-29192030-1